PANTHERFIBEL
manual for Panther tank crews
The designation D655/27 might only ring a bell with the most dedicated of enthusiasts, but mention the Pantherfibel and virtually anyone with even a passing interest in tanks will know what you mean. It is, of course, the illustrated and rhyming manual produced for the crews of the Panther tank. The word Fibel means "primer" in German – a children's first reader – and the name is genuinely apt, since the manual conveyed information and instructions in a highly entertaining and accessible way, using simple examples and witty illustrations. The idea was naturally to motivate soldiers to actually read the manual with some enthusiasm and to remember what they had read.
Compared to the more famous Tigerfibel, the Pantherfibel lacked the erotic element, but in our view it was a considerably more polished and thoroughly crafted publication overall. The illustrations were of higher quality and the treatment of individual topics more inventive. Worth noting too is the fact that the authors of the Pantherfibel made an effort to broaden their readers' horizons in areas one would hardly expect to find in a tank manual. For some situations they drew on examples from classical mythology – a tankman could learn, for instance, who Penthesilea, queen of the Amazons, was (amusingly renamed Panthersileia in the manual). Elsewhere, the manual explains that poorly maintained cables inside a tank can become just as dangerous as the serpents that strangled Laocoon and his two sons in ancient Troy – and the accompanying illustration is drawn in precisely the style of the famous sculptural group in the Vatican Museums (see it HERE). On other pages you encounter quotations from German writer Wilhelm Busch, French statesman Georges Clemenceau, and even Shakespeare's Hamlet.
As with the already-mentioned Tigerfibel, the Pantherfibel was published considerably later than the Panther tank itself entered service – specifically in July 1944, almost exactly one year after the Panther's combat debut at the Battle of Kursk. This timing allowed the authors to draw on real operational experience from actual crews, as well as on data about the most common mechanical failures that could have been prevented by proper maintenance.
I should point out to readers that they will not find every page of the Pantherfibel below – only a selection of the more interesting ones. Likewise, the summaries of each page are by no means literal translations; they are brief summaries of the content with any notable points of interest highlighted.
SELECTION OF CONTENTS:
Introduction
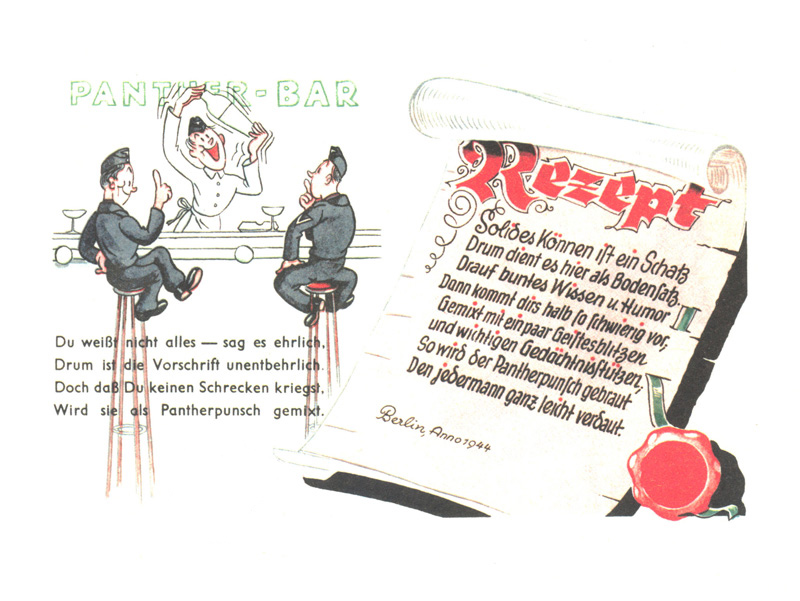
You can never know everything – that's what regulations and manuals are for. So we don't overwhelm you, we've mixed them up for you like a cocktail. The recipe is simple: solid skills are stirred together with colourful knowledge and a dash of humour, a few memory aids are added, and the result is Panther Punch – something anyone can handle!
Page 1

The message of this page could be summed up in one sentence: "Watch out for the linden leaf!" The knight Siegfried, hero of the Nibelungenlied, slew a dragon and then bathed in its blood. This bath turned his skin into an impenetrable "armour", making him invulnerable. Unfortunately, during the bath a leaf fell from a nearby linden tree and stuck to his back – the skin beneath it never came into contact with the dragon's blood and remained vulnerable (rather like Achilles' heel) … and Siegfried paid dearly for it later. The linden leaf symbol therefore marks the vulnerable zone around the tank throughout the rest of the manual.
Page 3
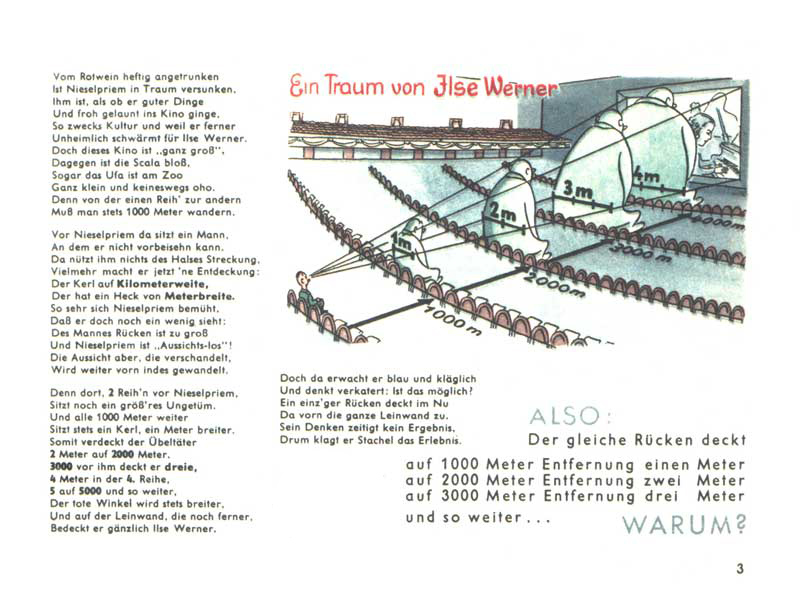
Nieselpriem (something like "grumbler" in German), drunk on red wine, fell asleep and dreamed he went to the cinema to see a film starring his beloved Ilse Werner. It was an enormous cinema where the rows of seats were exactly 1,000 metres apart! The man sitting directly in front of him was a giant whose back was precisely 1 metre wide, blocking his entire view of the screen. The row further ahead held another giant with a 2-metre-wide back, and then another, and another, each one with a back a metre wider than the last. Nieselpriem woke up and wondered: is it even possible for each of them to perfectly cover the person in front of him while also filling the full width of the screen?
Page 4
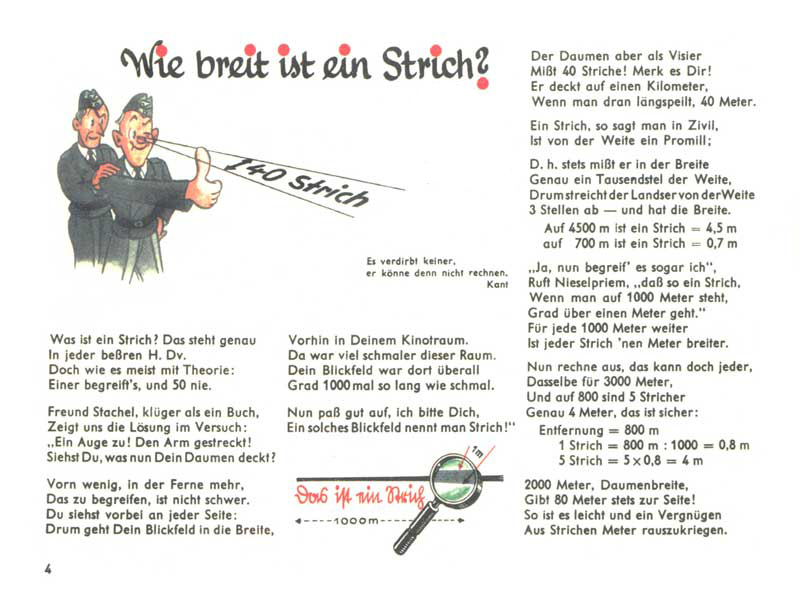
How wide is one mil? If you stretch out your arm, raise your thumb and look 1,000 metres into the distance, your thumb covers a width of roughly 40 metres. Your thumb is therefore 40 mils wide. A mil is thus something like one thousandth – it is an angular unit whose arc length is 1,000 times its width. For every thousand metres of distance, a mil is therefore exactly one metre wide. This means that at 800 metres, one mil is 0.8 metres wide, and if an object 800 metres away spans 5 mils, it is in reality 0.8 m × 5 = 4 metres wide.
Page 5
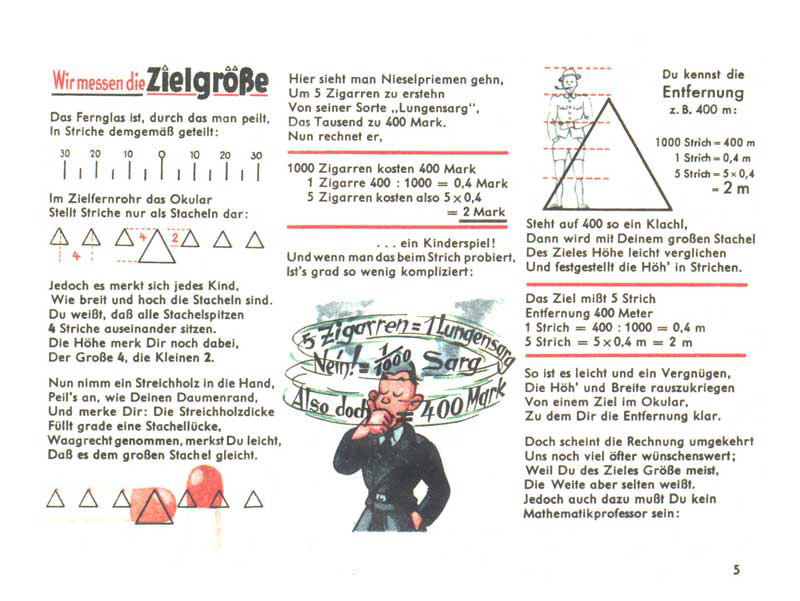
Measuring the size of a target: in your sight you see something like chevrons or triangles. The small ones are 2 mils tall, the large one is 4 mils tall, and the distance between the tips of two adjacent chevrons is always 4 mils. If a man standing 400 metres away spans 5 mils in height in the sight (the height of the large chevron plus 1 mil above it), you can calculate that he is 2 metres tall (0.4 × 5). This calculation works in reverse, however – far more often you already know the size of the target but not its distance.
Page 6
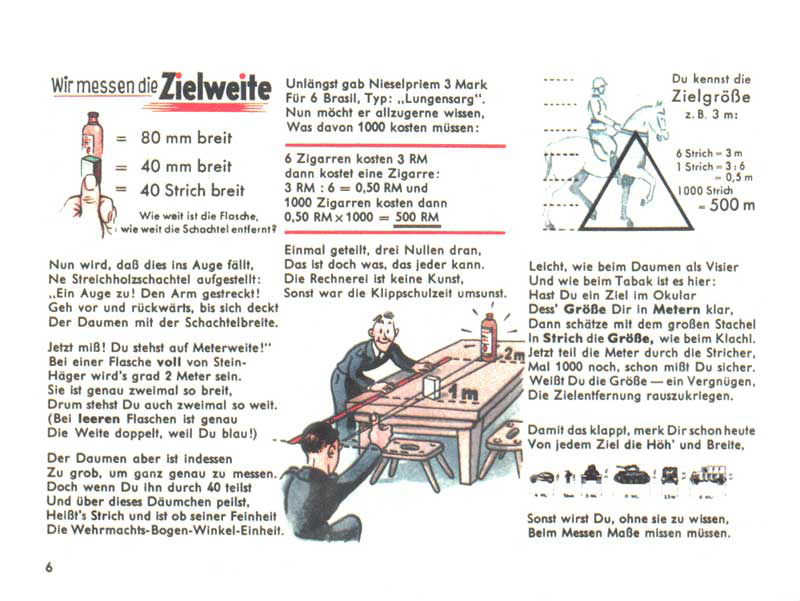
Measuring the distance to a target: try placing a matchbox on a table. Now raise your thumb, close one eye, and move until your finger covers the entire matchbox. Your thumb is roughly 40 mils wide and a matchbox is roughly 4 cm wide. So when your thumb covers the matchbox, you are about 1 metre away from it. And if you place a bottle of Steinhäger (a spirit similar to gin) a metre behind the matchbox, it will also fit behind your thumb – its width is 8 cm. If you know the dimensions of a target, you can therefore calculate its distance.
Page 8
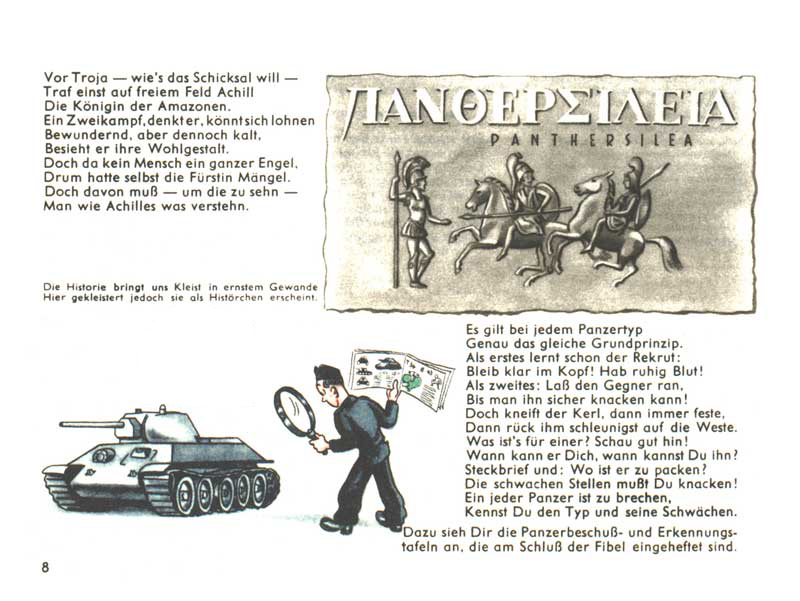
You must read the enemy – not like Achilles when he fought the queen of the Amazons. Always keep a cool head. Let the enemy tank come within the range at which you can deal with it. Study it carefully, identify the type, and recall where its weak spots are. To be able to do this, make sure you have thoroughly studied the enemy tank types and their characteristics summarised at the back of the Pantherfibel.
Page 10
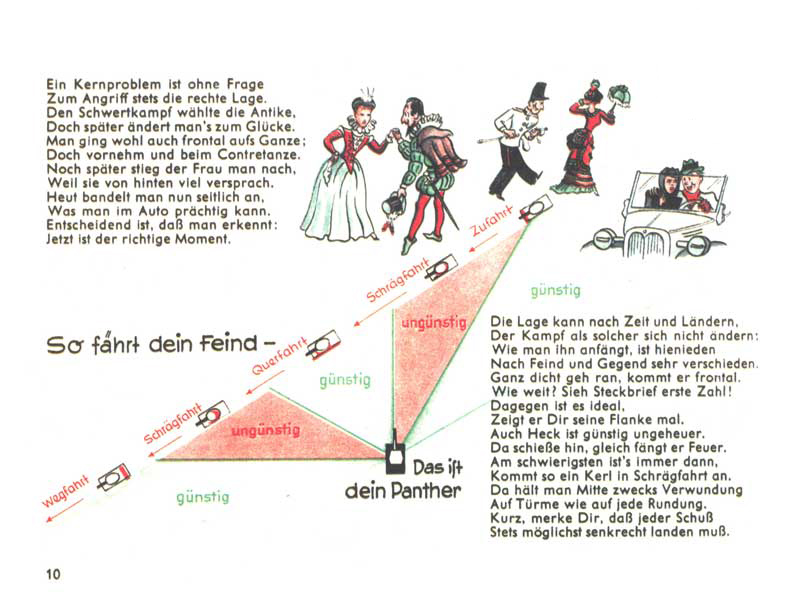
Just as with courting ladies in days gone by, timing is often decisive in battle too. Remember that your shell should strike the enemy's armour as close to perpendicularly as possible. Avoid firing at too oblique an angle. The simple diagram shows which angles are favourable (günstig) and which are unfavourable (ungünstig) for opening fire on a moving tank.
Page 16
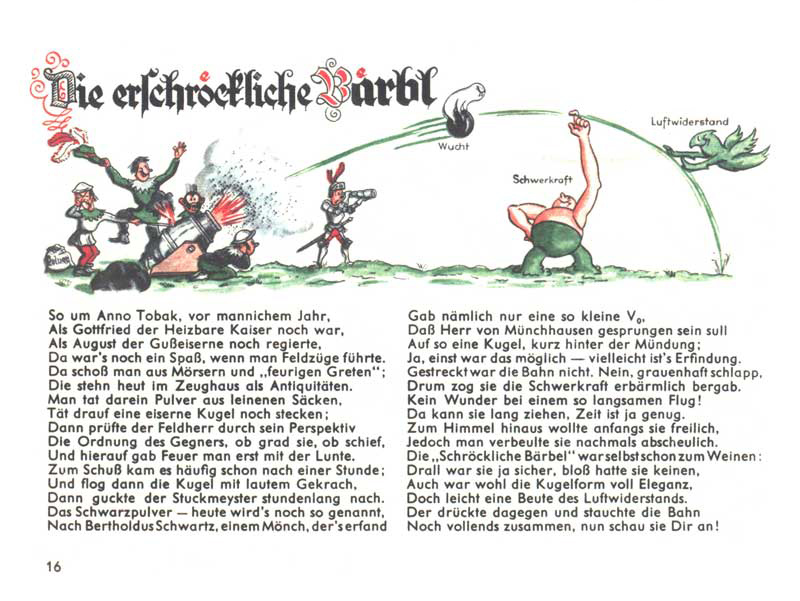
In the old days, when lead was cast and shots were fired from mortars now found only in museums, shells flew so slowly that Baron Munchausen (German: Herr von Münchhausen) could jump onto one mid-flight. A shell moving that slowly was easily dragged down by gravity. And while round cannon balls were certainly elegant, they lost far too easily to air resistance.
Page 17
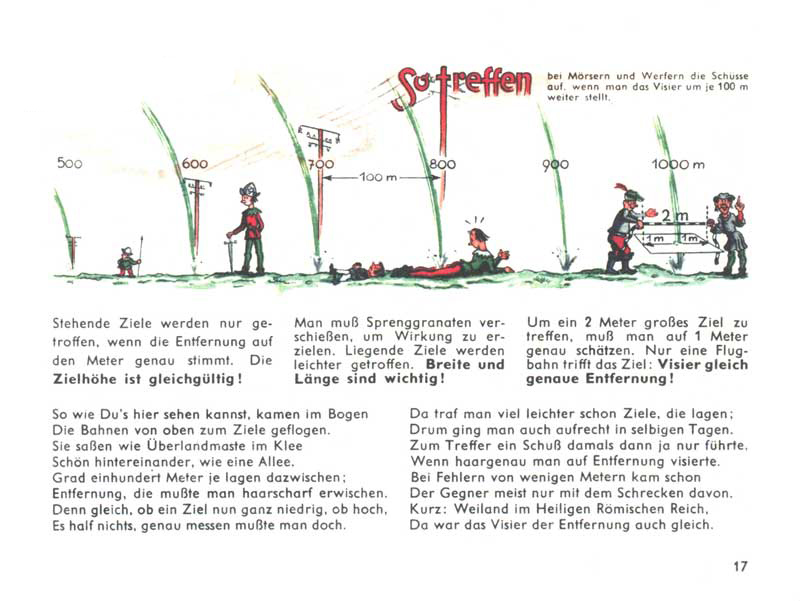
Shells from old mortars travelled in a high arc and struck the target from above. When the gunner adjusted his sights by a hundred metres, the ball simply landed a hundred metres further away. The height of the target made no difference – if the gunner misjudged the distance by even a few metres, he missed.
Page 18
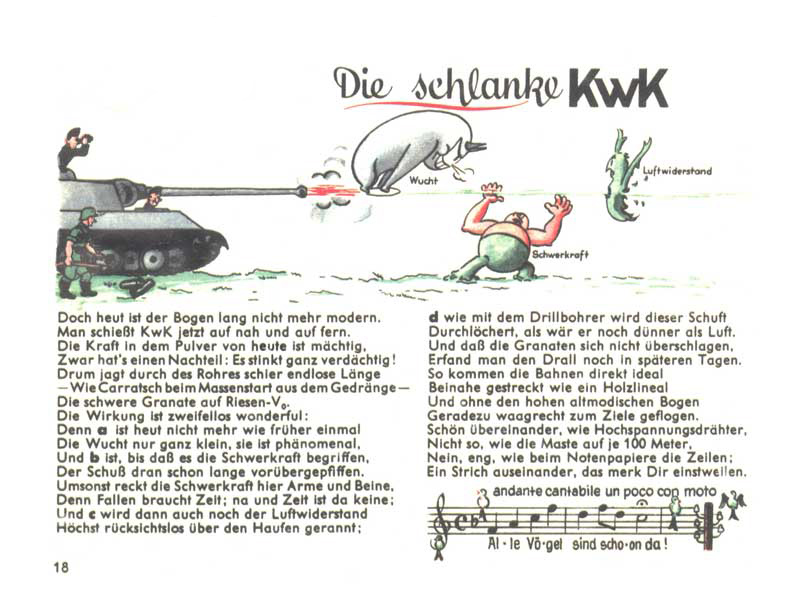
The slender gun. Arcing trajectories are out of fashion now. Today's tank gun (KwK) can engage targets at close range and at long distance alike. The power of modern propellant and a long barrel work wonders, driving even a heavy shell to enormous muzzle velocity. Gravity grasps at it in vain and it bores through air resistance like a drill. Such a shell flies almost horizontally – straight as a ruler, like the lines of a musical staff.
Page 19
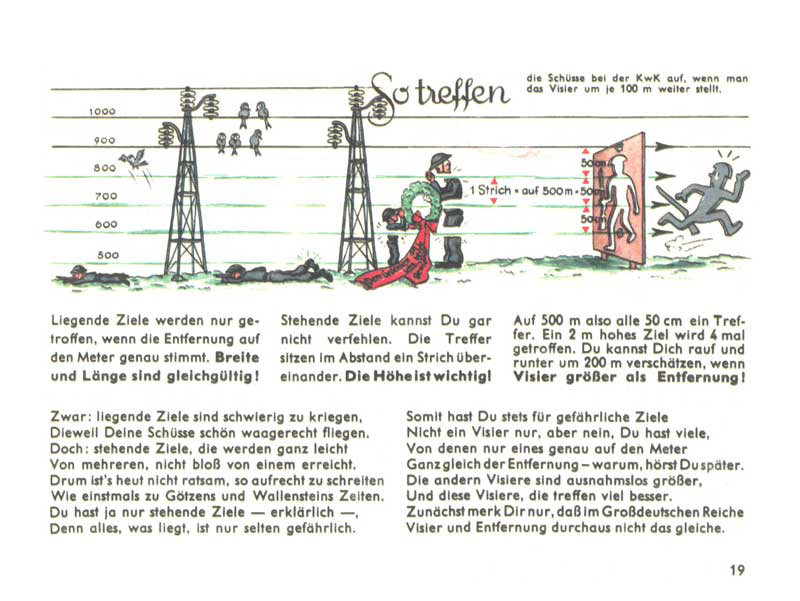
And this is how a tank gun hits when the range setting is adjusted in increments of one hundred metres. With direct fire like this, the height of the target works in your favour. If you are firing at a target 500 metres away and 2 metres tall, adjusting the sight in 100-metre steps will hit it four times over. That means you can be off by 200 metres too short or 200 metres too long and still score a hit – just a little higher or a little lower each time. Firing at a prone target, by contrast, is far more difficult – but such a target is unlikely to pose any great danger to you.
Page 21
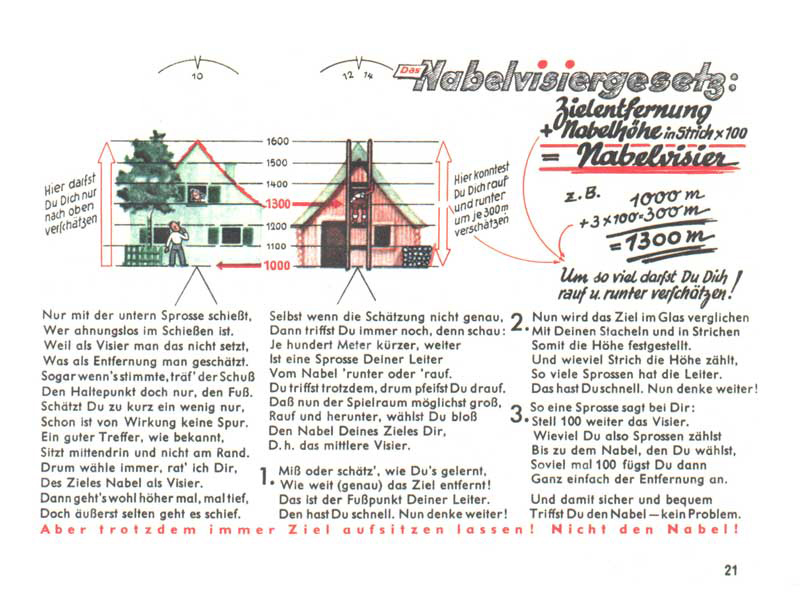
Correct aiming is not just about setting the sight to the measured range. If you do only that, you will hit only the very base of the target, right at the ground. If you want to strike the centre of the target (its "belly button"), you must also account for its height. You should therefore set the sight to the target's range plus the height of its centre in mils multiplied by 100. So for a house 1,000 metres away that appears 6 mils tall in the sight, you should set 1,000 + 3×100 = 1,300 metres – that will hit the centre of the house. As the diagram shows, however, the target will actually be hit anywhere between settings of 1,000 and 1,600 metres.
Page 23
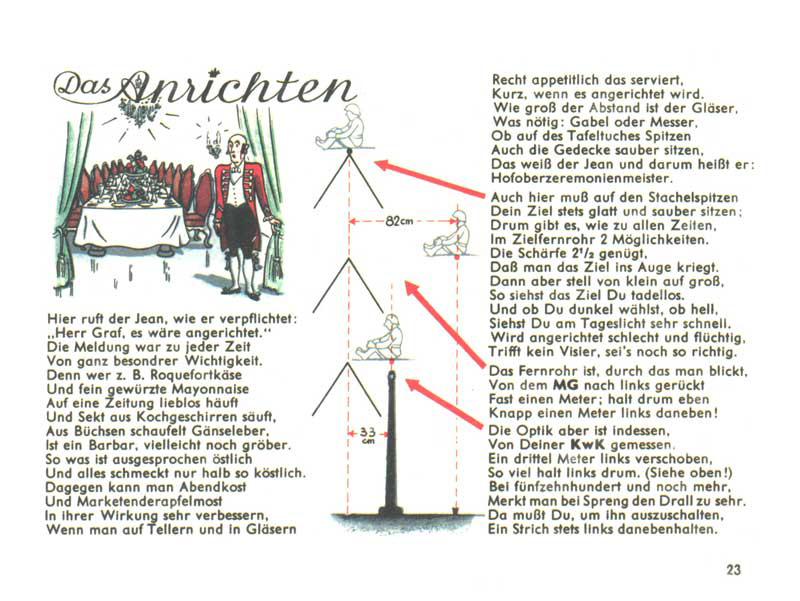
Just as a nobleman's valet must know precisely how to arrange plates, cutlery and glasses on the table, the gunner must bear in mind that the axis of his sight is offset slightly to the left of the axis of the weapons. For the main gun this is 33 cm – not a huge issue since it is typically fired at large targets at long range. The machine gun is another matter: it is aimed through the same sight, yet its axis is 82 cm away from the sight's axis, and the machine gun is fired at far smaller targets!
Page 24
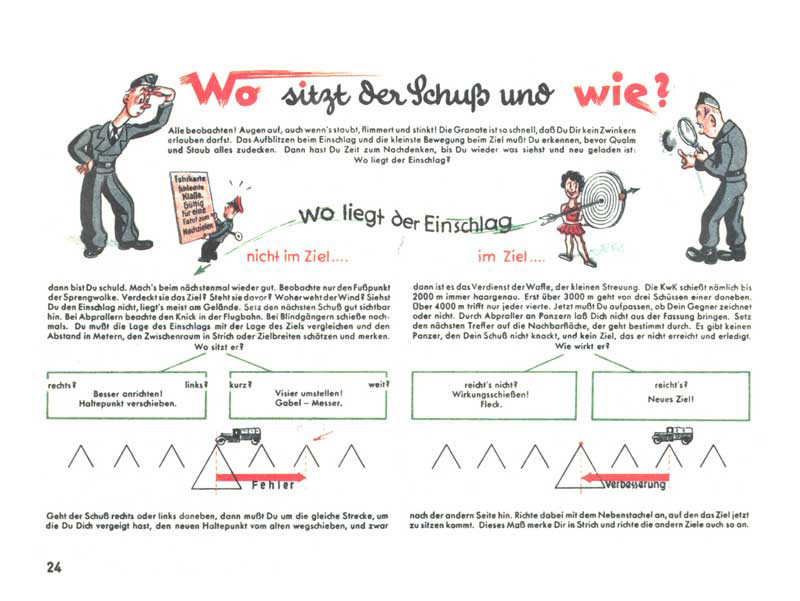
Where to place the shot and how? Even if it smokes, flashes and stinks when you fire, keep your eyes open! The shell travels so fast you cannot afford to blink. You must see where it lands before the dust and smoke block your view. Was it a hit? If not, you must adjust your aim. Remember that up to 2,000 metres your gun always shoots true – if you missed, it may be due to wind, and you need to aim off to compensate. If the shell ricocheted off the target, simply try aiming a fraction to one side.
Page 27
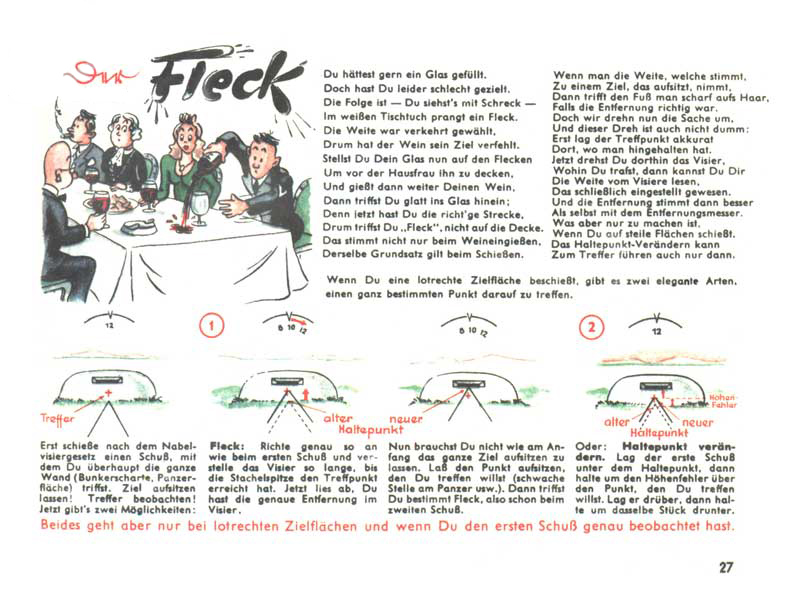
Point target. If you cannot pour wine and miss the glass, you leave a stain on the tablecloth. Move the glass exactly onto the stain and try pouring again in exactly the same way – you will find you hit it this time. The same trick works when firing at a point target such as a bunker embrasure. Aim as best you can and fire. Then readjust the range setting until the sight is pointing precisely at where the shell landed – you now have the correct range in your sight and can try the second shot. Or simply remember how far the first round's impact was from your aiming point and factor in that deviation when laying the second shot.
Page 34
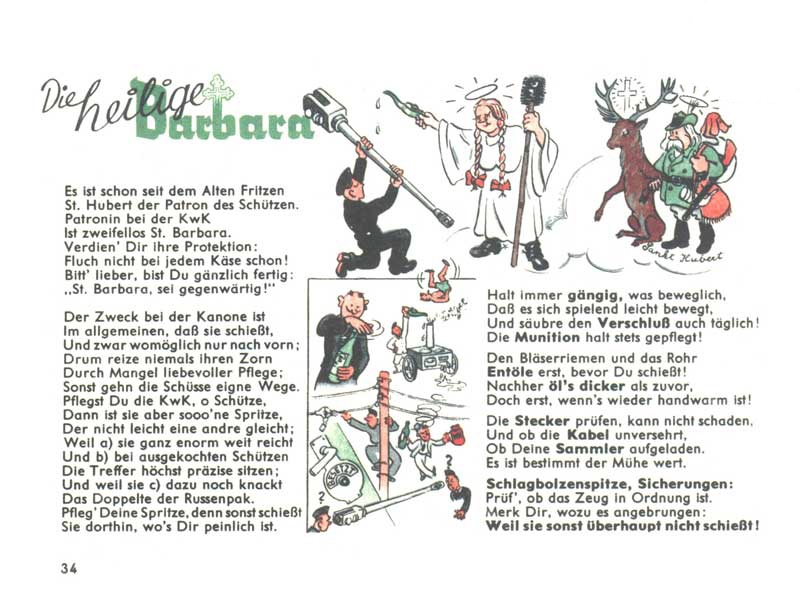
Hunters have St Hubert as their patron; yours is St Barbara (patron of artillerymen and pyrotechnicians), so stay on her good side. The gun's purpose is to fire – preferably forwards. So look after it, if you don't want it firing in other directions instead. The weapon must be cleaned and oiled. Everything on the gun that moves must move freely and smoothly. Regularly inspect the cables, fuses, firing pin tip, gun breech, and also the ammunition.
Page 35
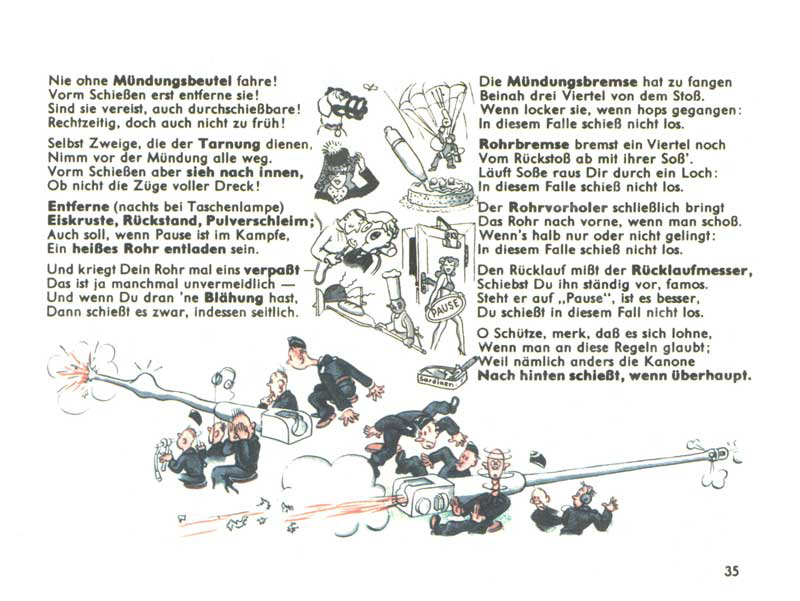
For longer road marches, fit the protective fabric cover over the muzzle – but don't forget to remove it before firing. If the cover freezes to the barrel in hard winter conditions, it can actually be fired through. Before any engagement, always remove any branch camouflage from the gun and carefully check that no debris has entered the bore. The muzzle brake at the end of the barrel absorbs up to three quarters of the recoil force – if it is damaged or missing, do not fire under any circumstances. Do not fire either if fluid is leaking from the gun's recoil mechanism. If the stop on the recoil guard has moved back to the "Pause" position, let the gun rest and cool down.
Page 38
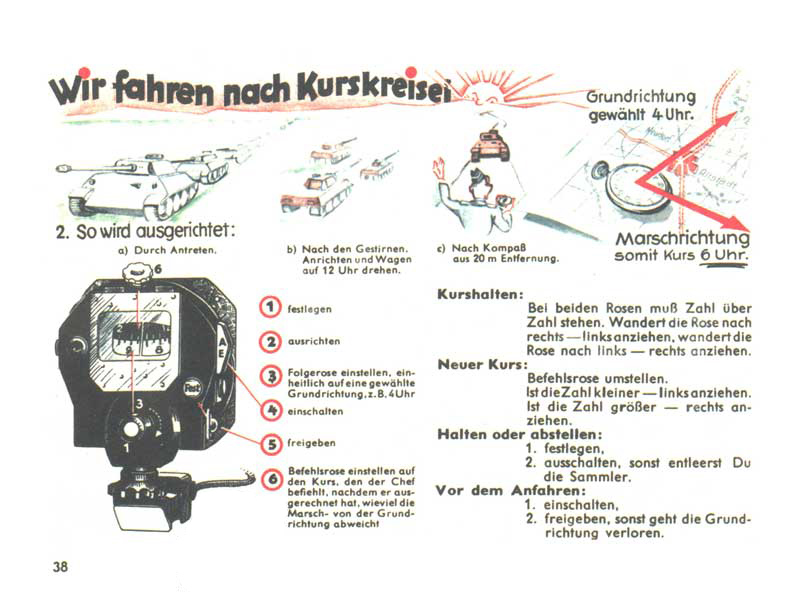
Navigating by directional gyroscope. First the tanks must be aligned (in column, by the sun, or by compass). The commander then uses a map and compass to determine the direction in which the tanks are currently facing (Grundrichtung) and the direction of march (Marschrichtung). To hold course, the driver manoeuvres the tank so that both scales of the directional gyroscope show the same reading. More about this instrument and how to use it can be read HERE.
Page 40
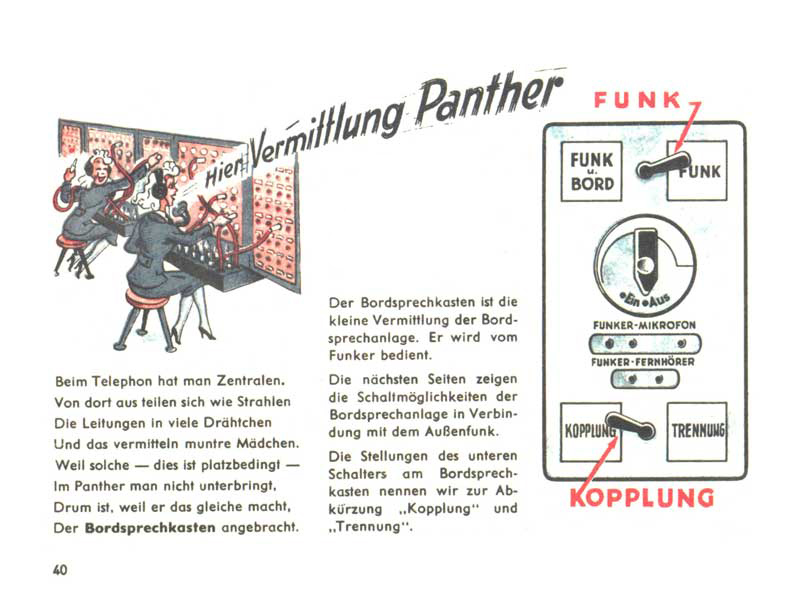
A telephone exchange requires cheerful girls to plug calls through. There is no room for such an exchange inside a tank, but fortunately the on-board intercom box (Bordsprechkasten) can do the same job – and the radio operator (Funker) runs it.
Page 41
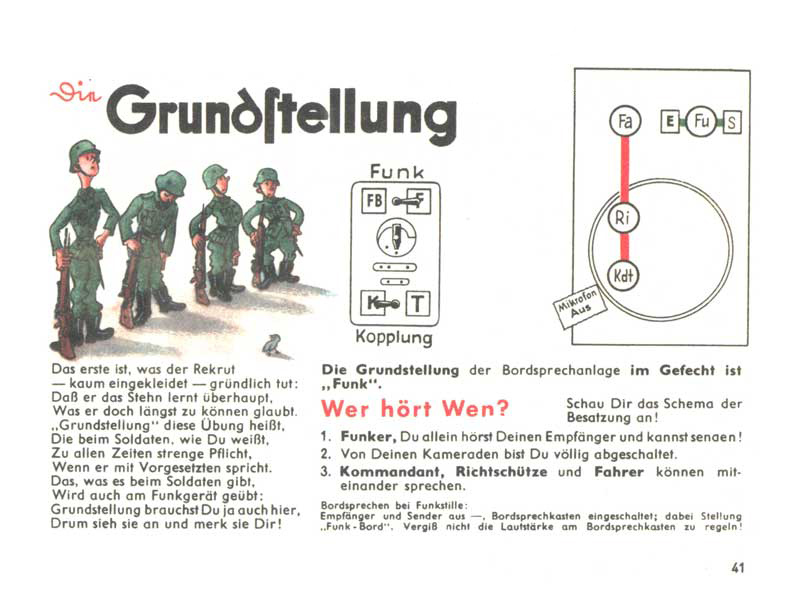
The first thing every soldier must learn is to stand to attention – his "basic position" (Grundstellung). The intercom also has a "basic position" the radio operator must know: the setting Funk und Kopplung. And who can hear whom at this setting? The diagram on the right shows all: Fu – radio operator, Fa – driver, Ri – gunner, Kdt – commander. The radio operator alone transmits and receives over the air, while disconnected from the rest of the crew. The commander, gunner and driver can talk amongst themselves.
Page 42
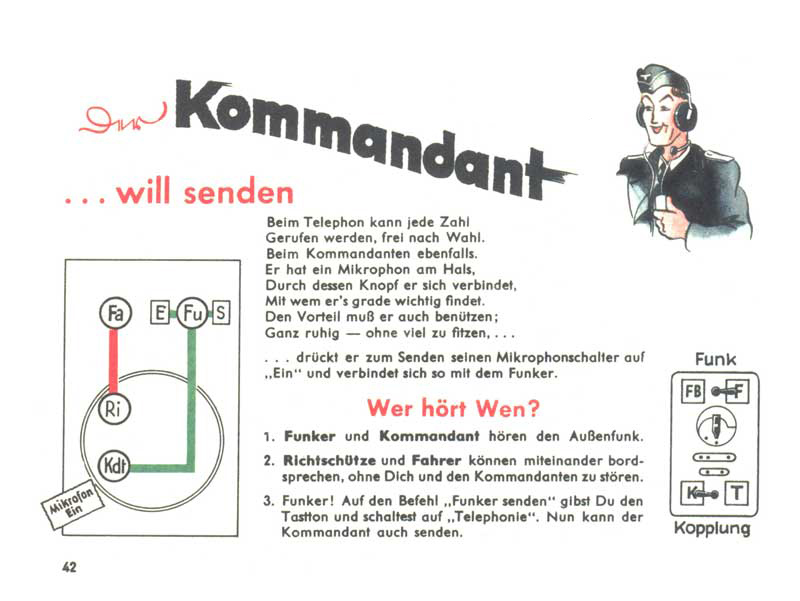
When the commander wants to transmit. Just as a person on a telephone can dial any number, the commander can switch his microphone to whoever he wishes to speak with. When he switches, he connects with the radio operator and both can then listen to external communications. If the commander also wants to broadcast himself, he gives the signal to the radio operator, who switches the intercom to the appropriate position. The driver and gunner can continue talking to one another in the meantime.
Page 43
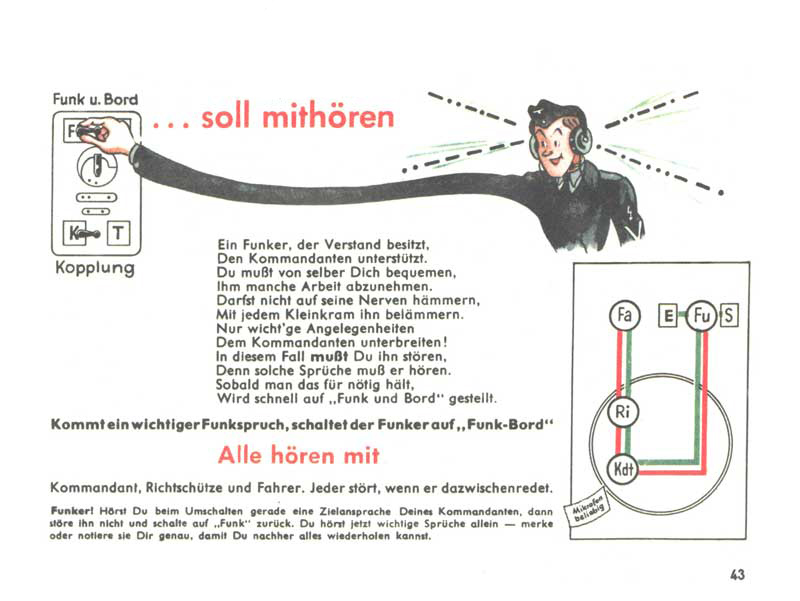
A good radio operator does not bother the tank commander with every piece of nonsense he picks up on the air. He turns to him only with important messages. When such a need arises, he switches the intercom to the Funk und Bord position, putting everyone on receive – driver, gunner, commander and radio operator alike. If the commander is directly occupied with combat, the radio operator must not disturb him; he takes the message himself, writes it down, and passes it to the commander only when the moment allows.
Page 44
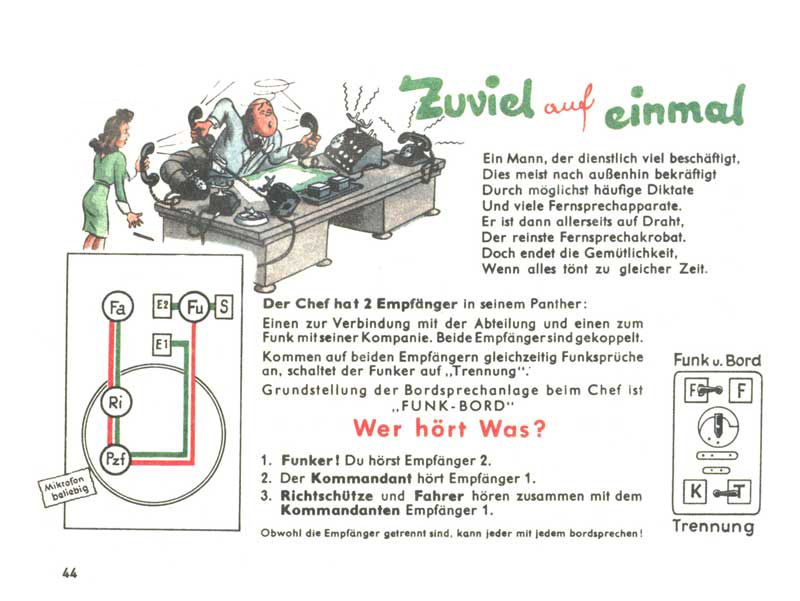
A lot for one man. The "boss" (in this case the company commander) has two receivers in his Panther – one for communicating with battalion command and one for communicating with the tanks in his company. The intercom's basic position here is Funk und Bord and Trennung. And who hears whom? The radio operator listens on receiver No. 2; the commander listens on receiver No. 1 (see diagram). The driver and gunner listen to receiver No. 1 along with the commander. Meanwhile, all four can still talk amongst themselves.
Page 48
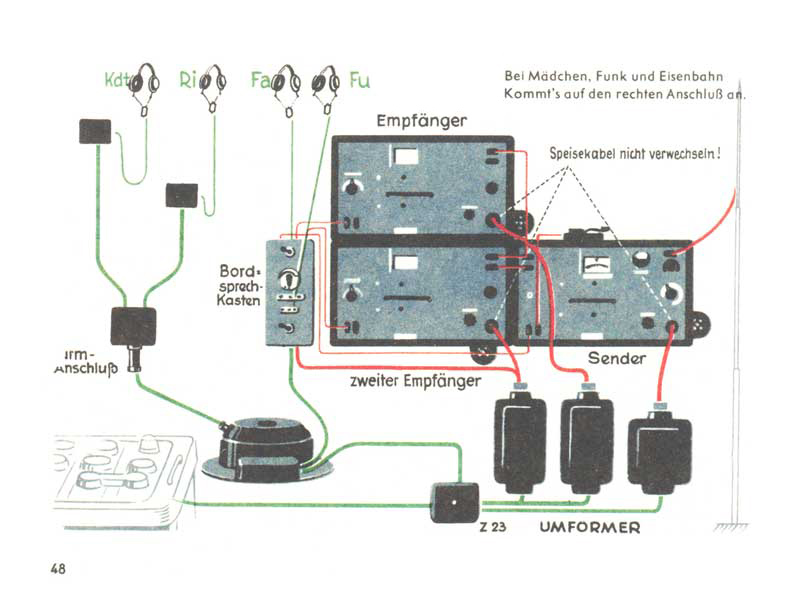
Wiring diagram for the radio installation in a command Panther, which carries one transmitter and two receivers. The system also includes voltage converters, the intercom box, a rotating joint connecting the hull to the turret, and finally four headset sets for the driver, radio operator, commander and gunner (the loader has neither headset nor microphone, as the cable would get in the way of his work).
Page 51
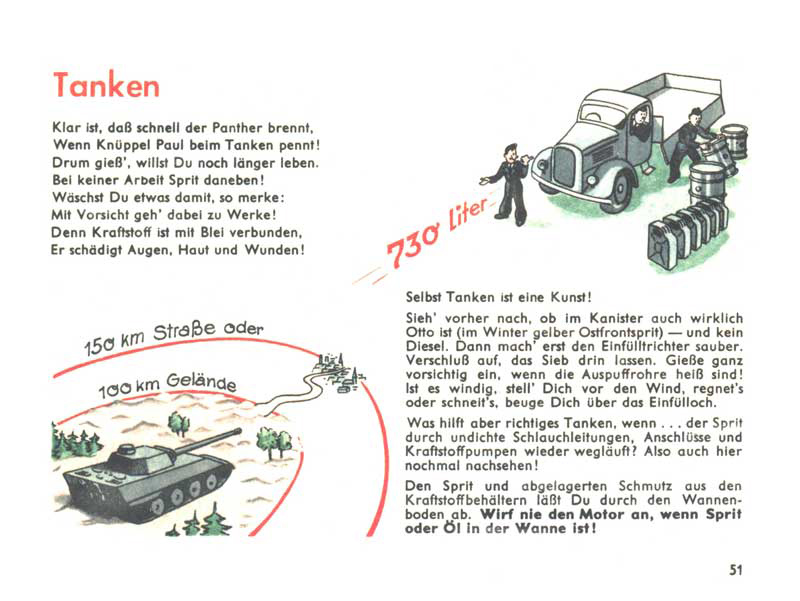
Refuelling is an art. First always make sure the jerrycan contains petrol and not diesel, clean the funnel, open the can and keep the strainer in it to catch dirt. If the exhaust pipes are still hot, pour fuel very carefully, and if there is a wind, position yourself to shield the opening. If it is raining or snowing, lean over the filler cap to cover it. But there are other things that need checking regularly too – drain the residual fuel with accumulated sediment through the tank's lower drain, and check that no petrol has leaked into the hull tray.
Page 52
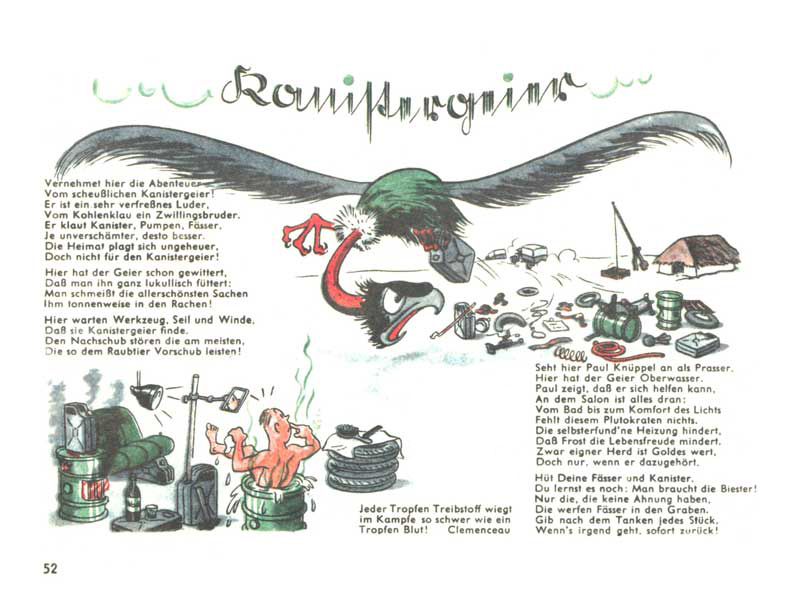
A drop of fuel is worth as much in battle as a drop of blood! This is the jerrycan vulture – a thoroughly greedy scoundrel who steals cans, pumps and barrels. At wastrel Paul Knüppel's place, the vulture is having a feast. Paul can sort himself out a nice bathroom with a stove, but he doesn't care about anything else. Supply is disrupted most by those who encourage the thieving vulture. Don't throw empty barrels into the ditch – they will be needed again.
Page 54
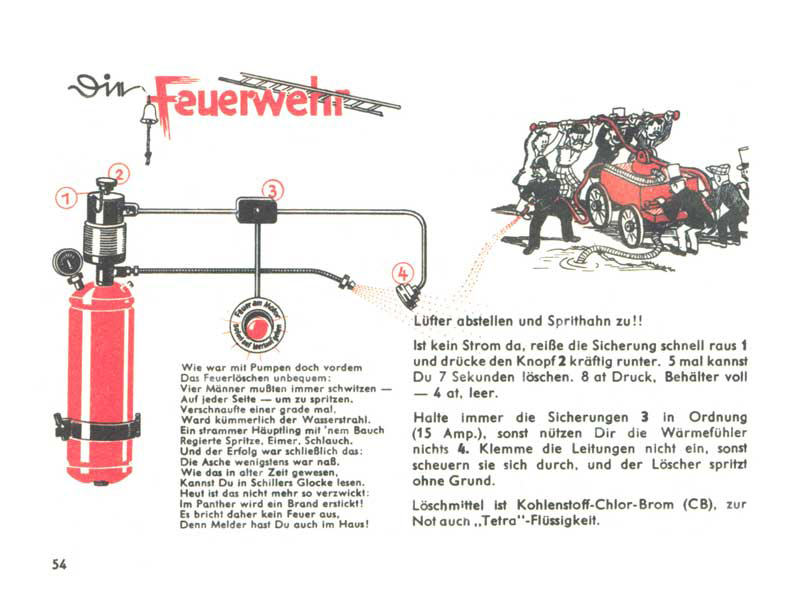
At the fire station. Fighting a fire used to be very hard work – four men sweating away on each side of the pump, and in the end all you got was wet ash. Today it need not be so complicated. The Panther has a fire suppression system so the fire need not break out at all. If the engine fire warning light comes on, quickly pull the safety pin and press the fire suppression button. There is enough extinguishing agent for five seven-second bursts.
Page 59
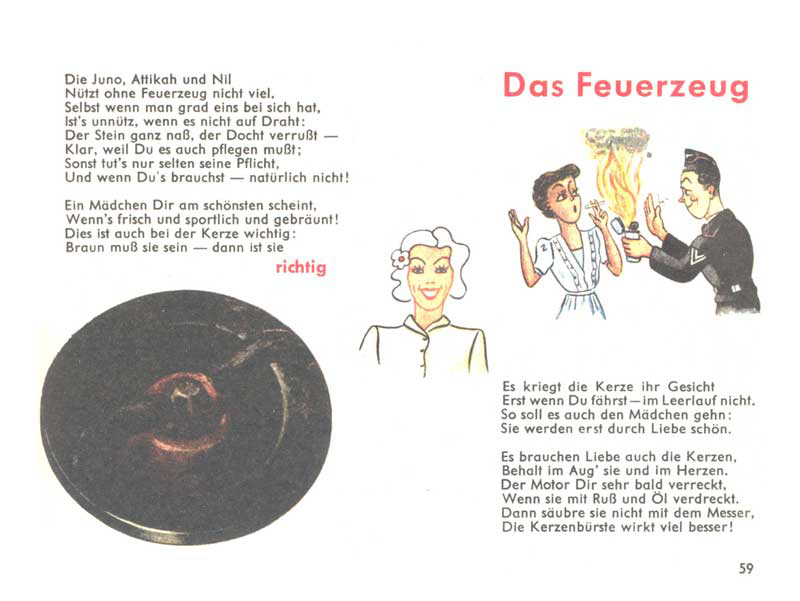
Cigarettes (the manual specifically mentions the brands Juno, Atikah and Nil) aren't much use without a lighter. But even if you have a lighter, it must be in working order. To keep it serving you, you simply have to look after it. The same applies to the spark plugs in your Panther's engine. Like a girl, a spark plug needs your love and attention.
Page 60
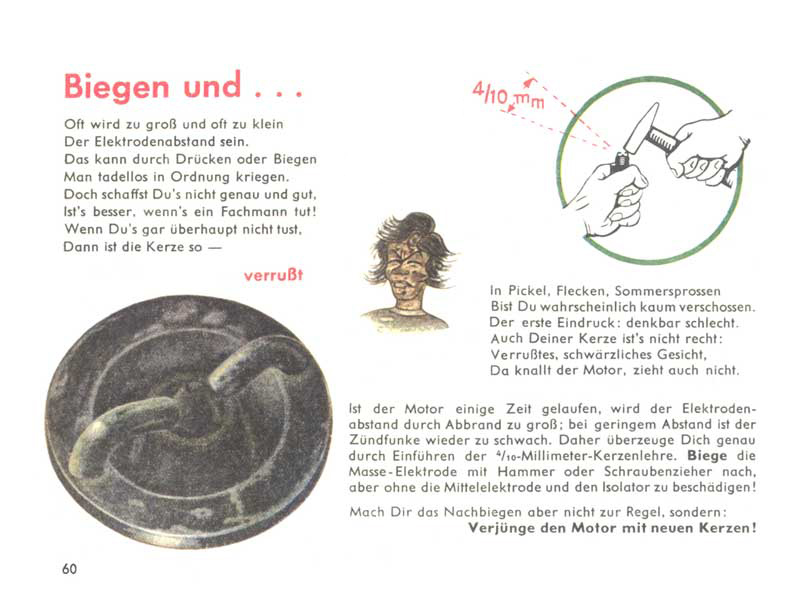
Sometimes the electrode gap on a spark plug may not be optimal and needs to be adjusted. Such a plug will be sooty and dirty and the engine will not pull properly. You must bend the outer electrode into the correct position using a hammer or screwdriver – but take care not to damage the insulator. To achieve the ideal electrode gap, insert a 0.4 mm feeler gauge between the electrodes. Remember, however, that bending the electrode is only a temporary fix – replace the plugs with brand new ones as soon as possible.
Page 61
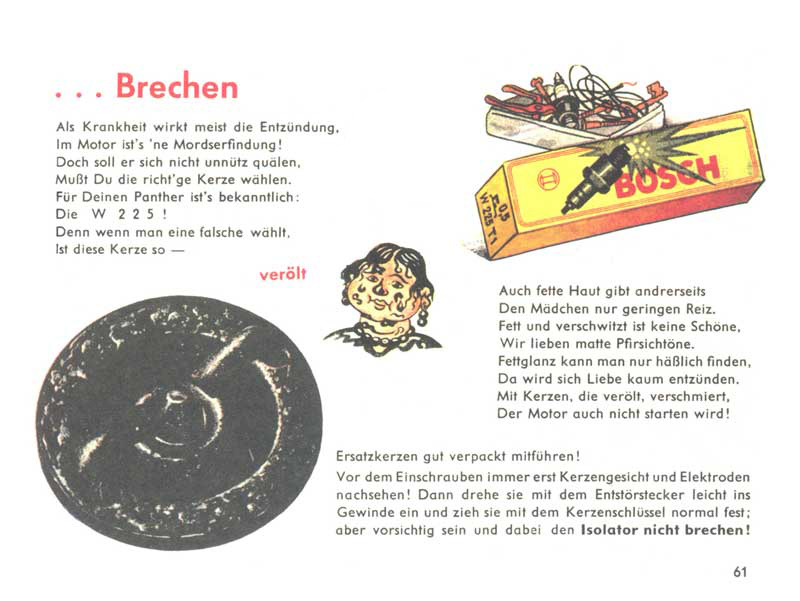
Your Panther requires spark plugs of type W225. If you use incorrect plugs, they may become oil-fouled. Just as a plump girl with a greasy face is unlikely to ignite your passion, a greasy plug will struggle to fire your tank's engine. Always keep the correct replacement plugs to hand, stored in their proper packaging!
Page 64
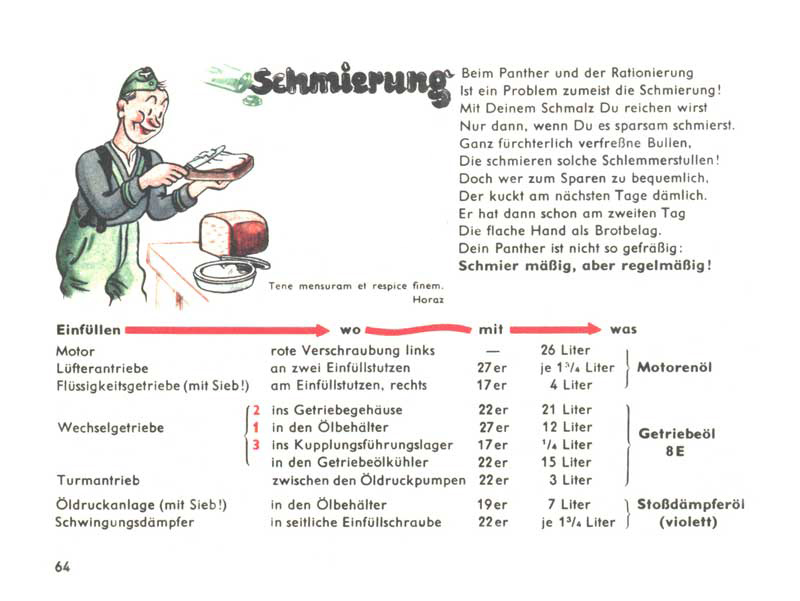
Lubrication. Lubricating the Panther is like spreading lard on your bread – you have to spread it so it lasts. If one man slathers on a thick layer today, the next man eats dry bread tomorrow. Lubricate sparingly but regularly! How much and where: 26 litres of engine oil in the engine, 21 litres of gear oil in the gearbox, 3 litres of gear oil in the turret traverse drive, and so on.
Page 65
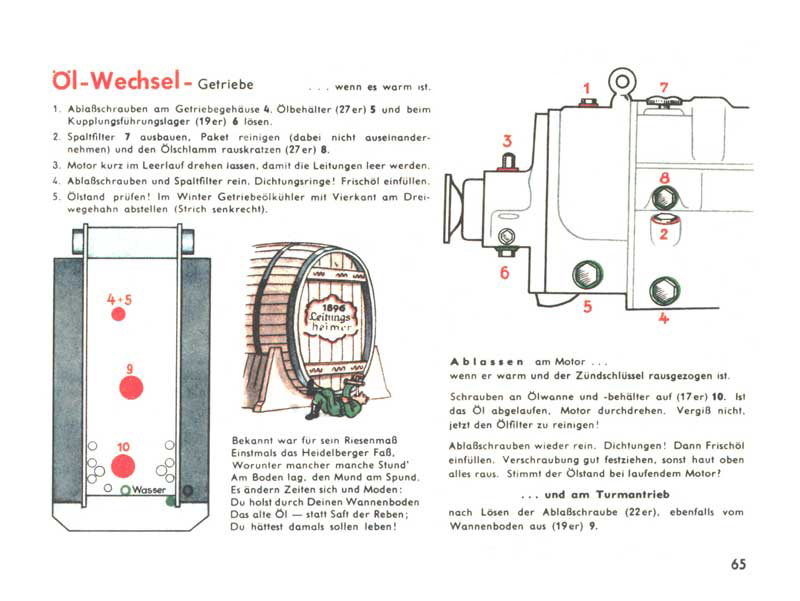
Changing the gearbox oil – while warm. Loosen the drain plugs on the gearbox casing (no. 4), on the oil tank (no. 5) and at the clutch pilot bearing (no. 6), loosen the filler cap and other screws as per instructions, start the engine and let it run briefly in neutral to draw oil out of the piping, check all gaskets, pour in new oil and check the level. In winter, remember to drain the oil cooler. The oil drains through openings in the floor of the hull tray, so you must crawl under the tank – rather like reaching under a barrel to tap wine from below. Opening no. 10 is for draining the engine oil, no. 9 for the turret traverse drive oil, and nos. 4+5 belong to the already-mentioned gearbox.
Page 66
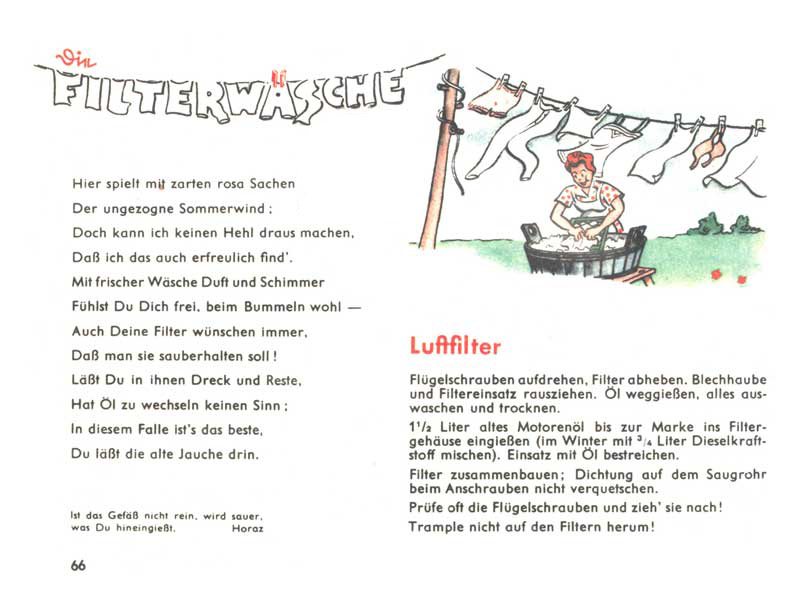
Cleaning filters. There is no point changing the oil if you leave dirt in the filters. Just as laundry needs washing, filters need cleaning. This page gives the procedure for cleaning the air filter.
Page 67
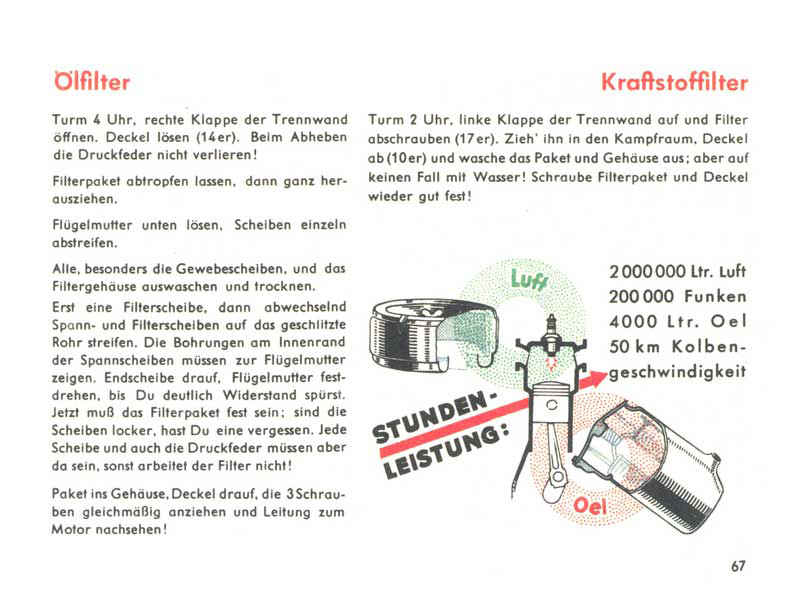
Continued instructions for filter cleaning, this time for the oil filter and fuel filter. Interesting detail: to access the oil filter, the Panther's turret must be turned to the 4 o'clock position, while for the fuel filter it must point to 2 o'clock. Further proof of why regular filter cleaning matters: the air filter passes an incredible 2 million litres of air every hour of operation, the oil filter handles 4,000 litres of oil in the same time. Meanwhile the spark plugs produce 200,000 sparks per hour, and the engine pistons travel up and down at a speed equivalent to 50 km/h!
Page 70
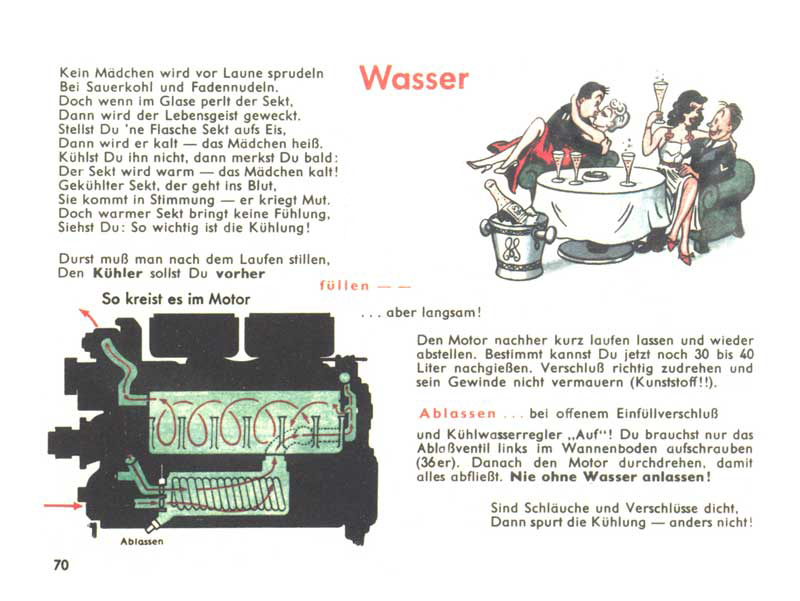
Sauerkraut and noodles won't put a girl in the mood. But when champagne fizzes in a glass, she comes alive. Well-chilled champagne can warm a girl up nicely – but if you stop cooling it, the drink goes warm and the girl goes cold instead. You see how important proper cooling is! What follows is a diagram of the coolant circulation in the engine, plus a simplified guide to filling and draining the radiator.
Page 71
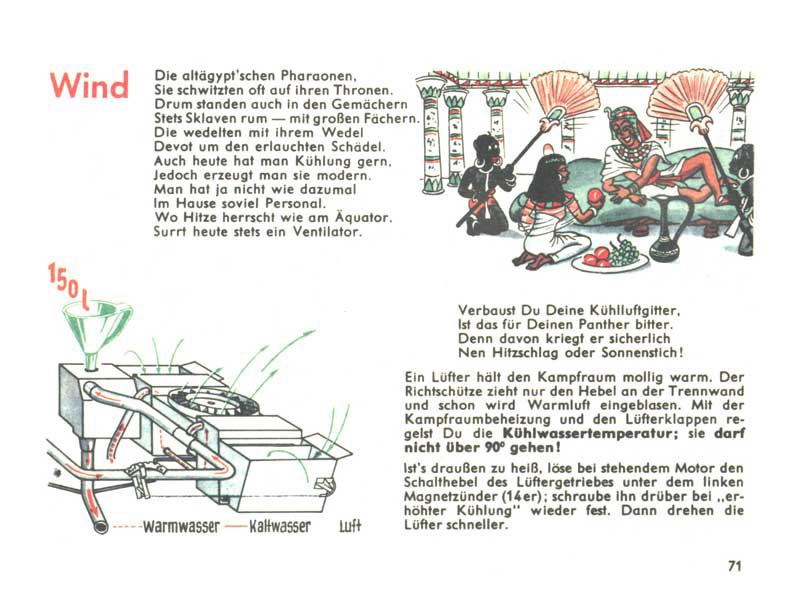
Even in ancient Egypt, pharaohs had their slaves fan them to stay cool. When we are hot today, we can use a fan. The coolant temperature must not exceed 90°C. You can regulate it by adjusting fan speed and by using the cabin heating. If it is very hot outside, switch the fans to a higher speed.
Page 72
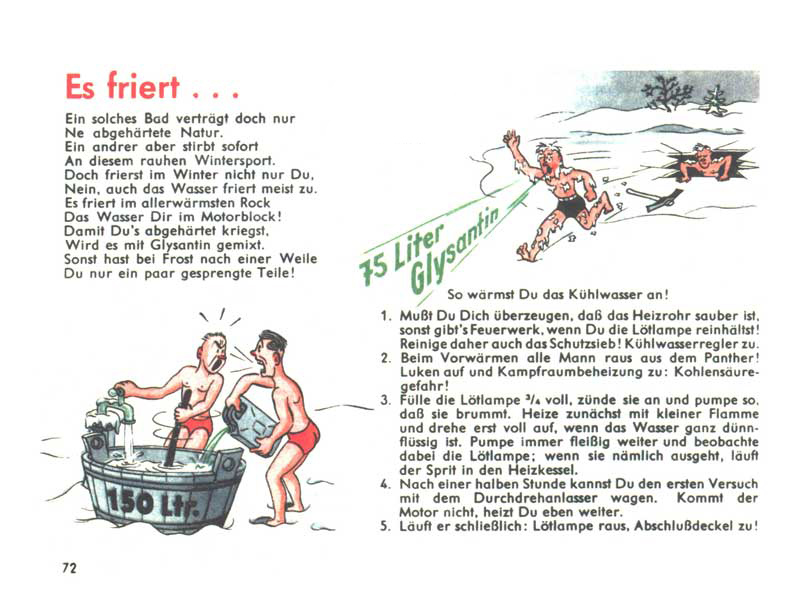
It freezes. An ice bath is a sport only for tough souls. But in winter it isn't just you that freezes – so does the water inside your tank's engine. You must "fortify" it with Glysantin (antifreeze), otherwise the engine will burst apart! And how to warm the coolant with a blowtorch? Great care is needed: everyone must exit the vehicle and all hatches must be left open to prevent CO2 build-up inside the tank. Start the blowtorch on a small flame first and pump the coolant. After about half an hour you can try turning the engine over; if it still won't go, keep heating.
Page 78
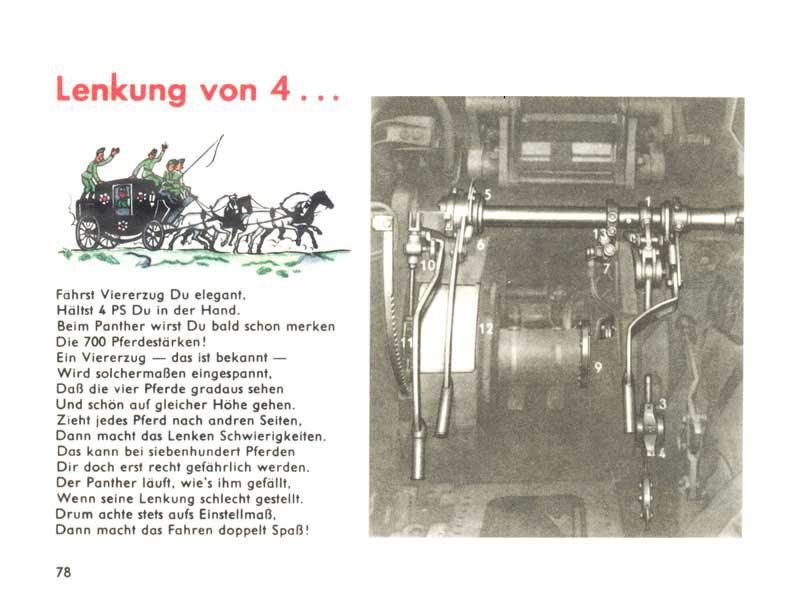
When you drive a four-horse carriage, you are controlling the power of four horses. The Panther, however, has 700 horsepower. If a four-horse team starts doing its own thing and pulling in different directions, that is bad enough. But if all 700 horses under your Panther's bonnet start misbehaving due to poor handling, it can get seriously dangerous.
Page 79
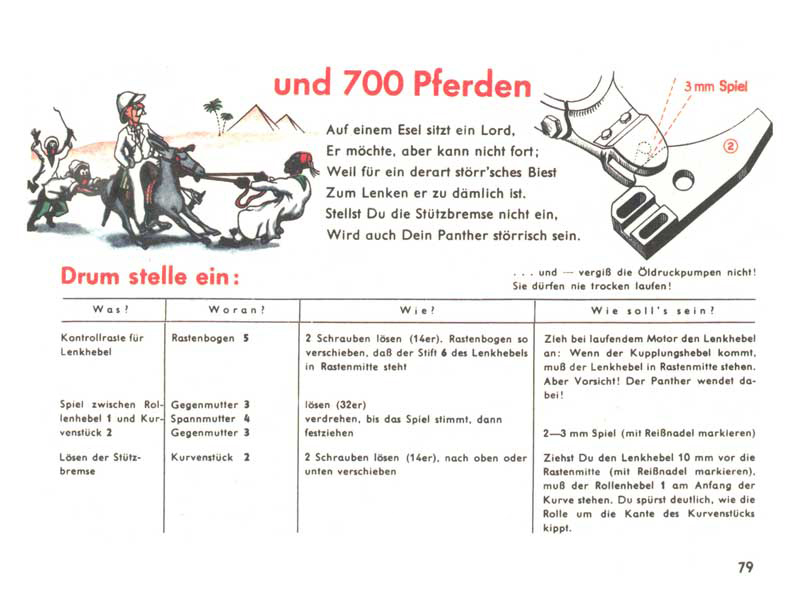
When a foolish lord climbs onto a stubborn donkey, he has no idea how to steer it. But a Panther can be stubborn too. To drive it with ease, you must ensure its controls are properly adjusted – the steering levers and brakes, for instance. The table on this page tells you what to adjust and how.
Page 83
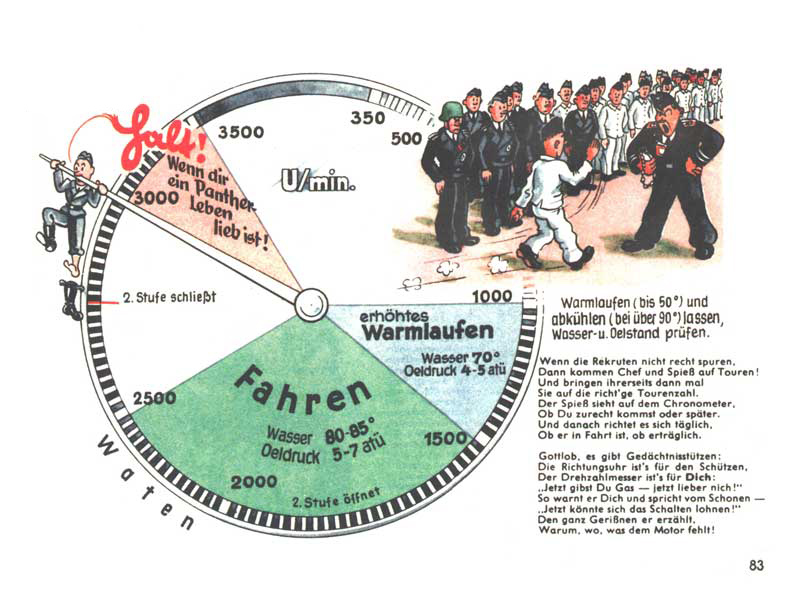
While the gunner uses a clock face as his reference tool, yours is the rev counter. It tells you when you should stop giving more throttle, when it might be worth changing gear, or when to let the engine breathe. According to the diagram, the range from 1,000 to 1,500 rpm is for warming the engine before driving (to at least 50°C) and for cooling it slowly afterwards (below 90°C). The range from 1,500 to 2,500 rpm is for normal driving – and if your Panther's life means anything to you, do not exceed 3,000 rpm!
Page 85
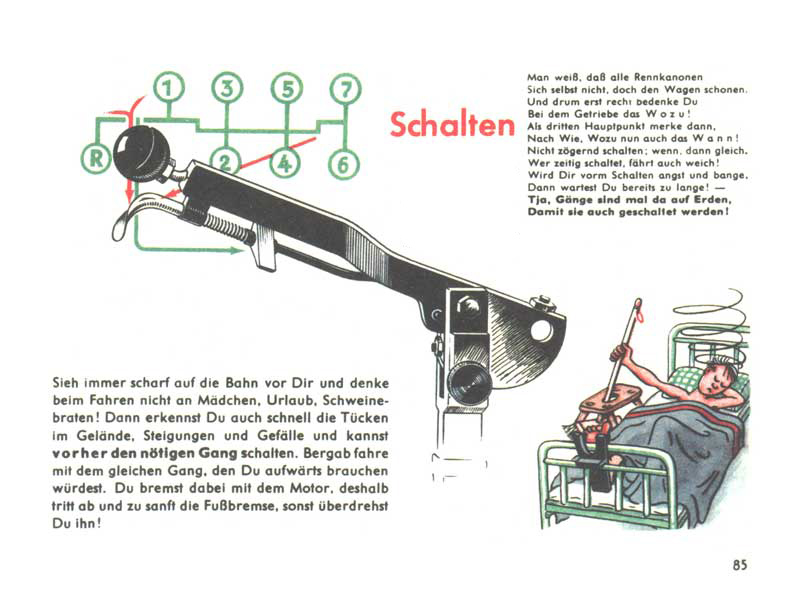
Always pay attention to the road ahead and don't think about girls, holidays or roast pork while you're driving! Only then can you spot an approaching hill or descent in time and prepare for a gear change. Go down a hill in the same gear you would use to climb it – the engine will brake nicely for you and you only need to help it lightly with the brakes now and then. Changing gear must never be hesitant; it must be done promptly and at the right moment. Gears exist to be changed!
Page 87
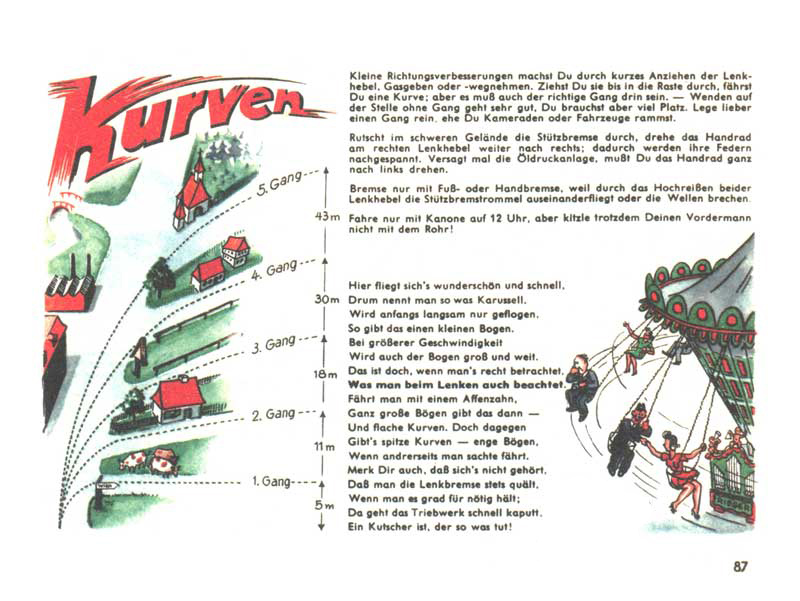
Turns. Minor steering corrections can be made on the move with just a light pull of a lever, easing off or adding throttle. But if you pull the lever further, you begin turning by braking, and at that point your current gear matters. It is like a carousel – the faster it spins, the wider an arc the seats describe. A tank at high speed must also make a wide arc when turning. And always drive with the gun pointed straight forward at 12 o'clock. The diagram shows the minimum turning radius at each gear.
Page 88
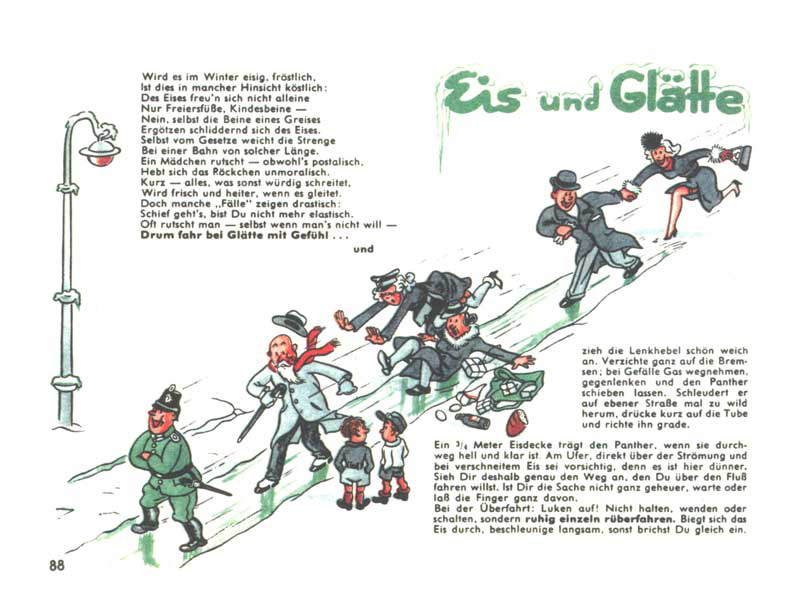
Winter and frost can bring a lot of joy. Not just children but adults too love to slide (even the "arm of justice" can be swept along). The trouble starts when you don't want to slide. Ice three quarters of a metre thick will safely bear your Panther. When crossing a frozen river, watch out especially near the banks, drive slowly and smoothly, do not change gear, do not stop, do not turn – and above all, leave all hatches open in case the tank needs to be abandoned quickly.
Page 89
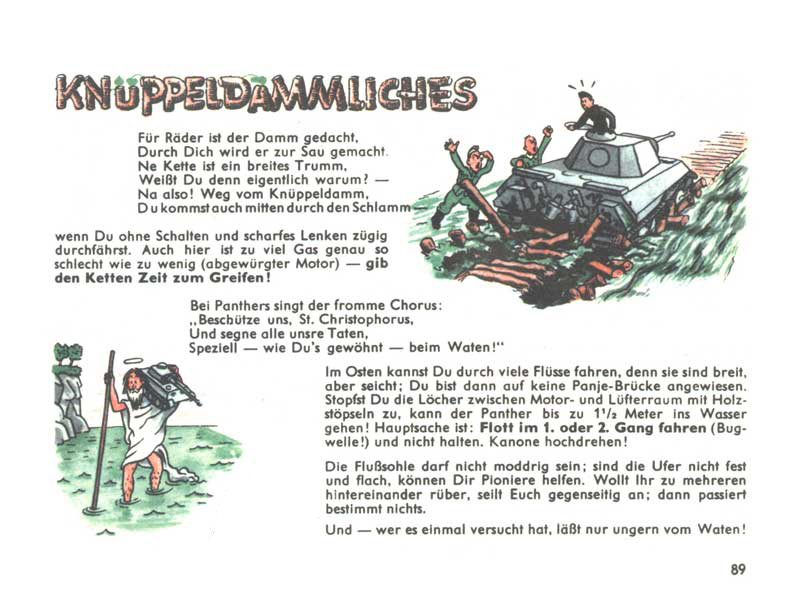
Dirt roads are not built for your tank – they are for cars. You would only destroy them. Your Panther can drive straight through mud, as long as you don't turn or make significant speed changes while doing so. Most of the streams and small rivers you encounter on the Eastern Front can also be crossed under your own power. Russian rivers are usually wide but shallow. And if you seal the passages between the engine section and the fan compartment, your Panther can ford water up to 1.5 metres deep. If the banks are not firm enough, ask the engineers for help – and don't forget to raise the gun barrel!
Page 90
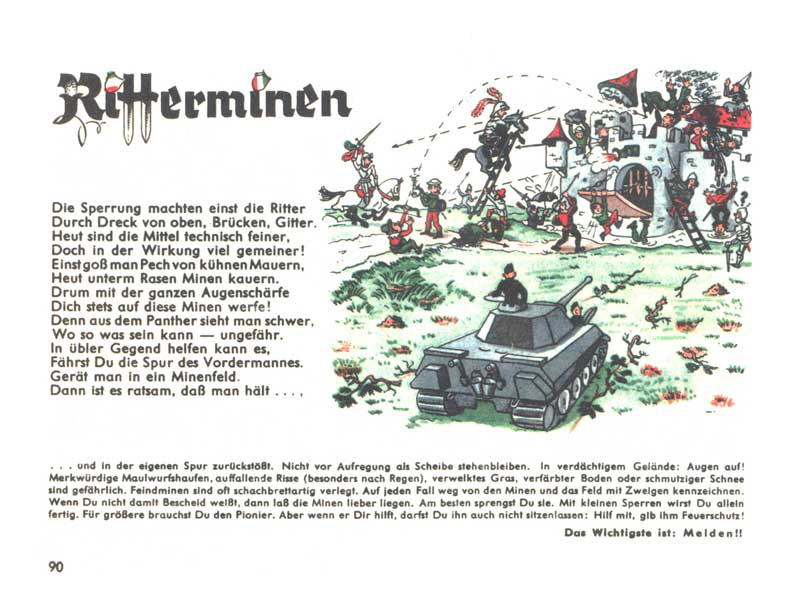
In the old days, defenders would protect themselves against knights' assaults with drawbridges and by hurling rocks or pouring filth from the ramparts. Today, mines may be laid in your path. They are hard to spot, but there are signs that can give them away: strange "molehills", patches of dry grass, cracked earth, dirty snow – particularly if they repeat at regular intervals. If you suspect you are in a minefield, stop immediately and try reversing back the way you came. Your crew can deal with a few mines on their own, but if the field is large, you will need the engineers. Every suspected minefield must be reported to your command!
Page 93
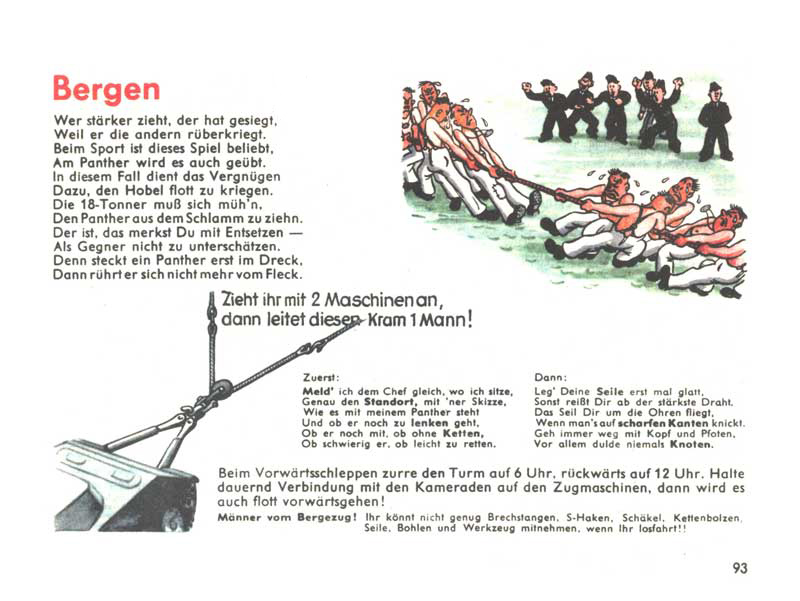
Recovery. A tug of war is a popular game, but recovering a Panther requires two 18-tonne recovery vehicles. If your tank gets stuck, report its exact position to your commander (best with a sketch) and tell him whether the tracks are intact and how deeply it is bogged down. Everyone must stand clear during the pull in case a tow cable snaps. Pay close attention that no cable has a knot in it! If the tank is being pulled forward, turn the turret to the rear at 6 o'clock; if it is being pulled backwards, the turret must point forward at 12 o'clock.
Page 94

The workshop is not there to sit idle. It can do a great deal for you, but you need to pull your weight too. Explain clearly to the foreman what your tank is lacking. Describe every fault or damage precisely. Before handing the tank over to the service crew, don't forget to unload all the ammunition and take your personal belongings with you – otherwise you may never see them again.
Appendix: T-34
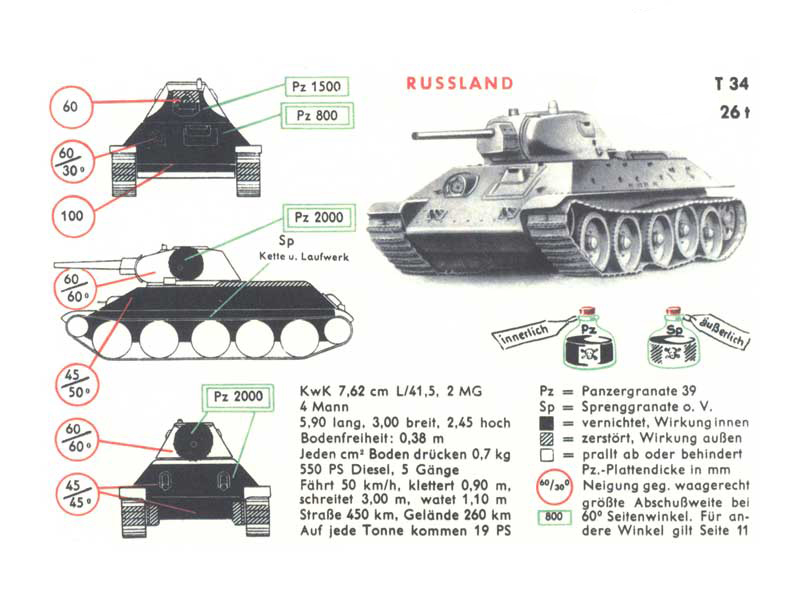
Basic characteristics of the Soviet T-34 tank. The little medicine bottles indicate that the armour-piercing round (Pz) is taken internally and the high-explosive fragmentation round (Sp) is applied externally. Hits on the black-shaded areas of the tank mean shell penetration and internal effect. Hatched areas indicate external effect only, while white zones are areas where the shell will ricochet or merely damage the tank without knocking it out. The figures in the green boxes show the maximum range for effective fire against each part of the tank.
Appendix: T-34
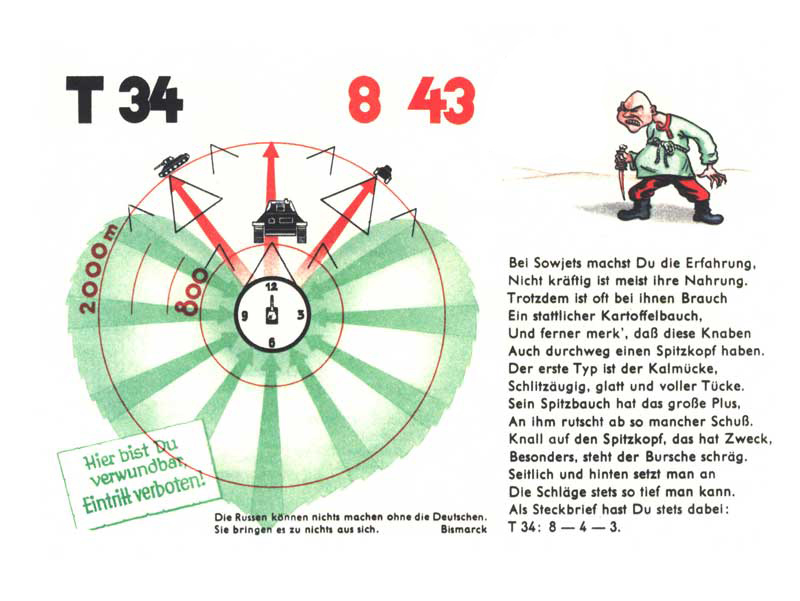
And here is the linden leaf, promised in the manual's introduction! The diagram shows the effect of a gun duel between a Panther and a T-34. The red arrows tell us that a Panther can destroy its opponent at 800 metres in a head-on engagement and at 2,000 metres when firing into its flank or rear. The green linden leaf, by contrast, marks the Panther's vulnerable zone – the area the crew must not allow the enemy to enter.
Appendix: KV-1
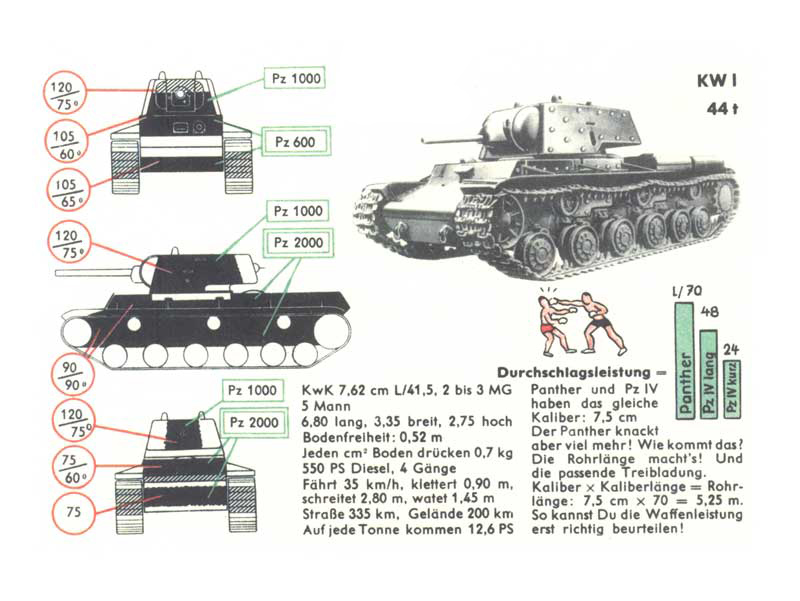
Parameters and characteristics of the Soviet KV-1 tank. Although the KV-1, Panzer IV and Panther all share the same 75 mm calibre, the Panther significantly outperforms the other two. The reason is its long barrel – 70 times the calibre in length, meaning 70 × 7.5 cm = 5.25 metres.
Appendix: KV-1
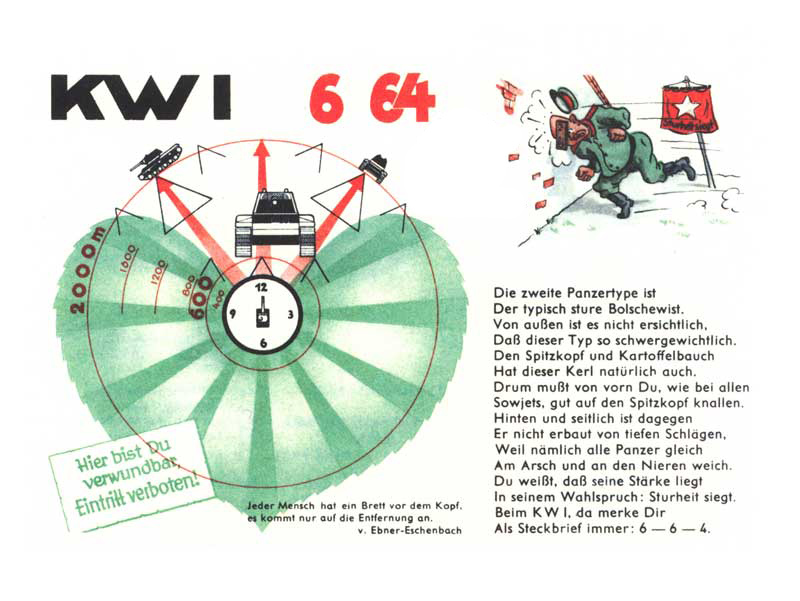
The KV-1 is a typical stubborn Bolshevik. To penetrate its frontal armour, you must close to within at least 600 metres. And once again, remember: do not let the enemy into the zone of the green linden leaf!
Appendix: M3 Lee
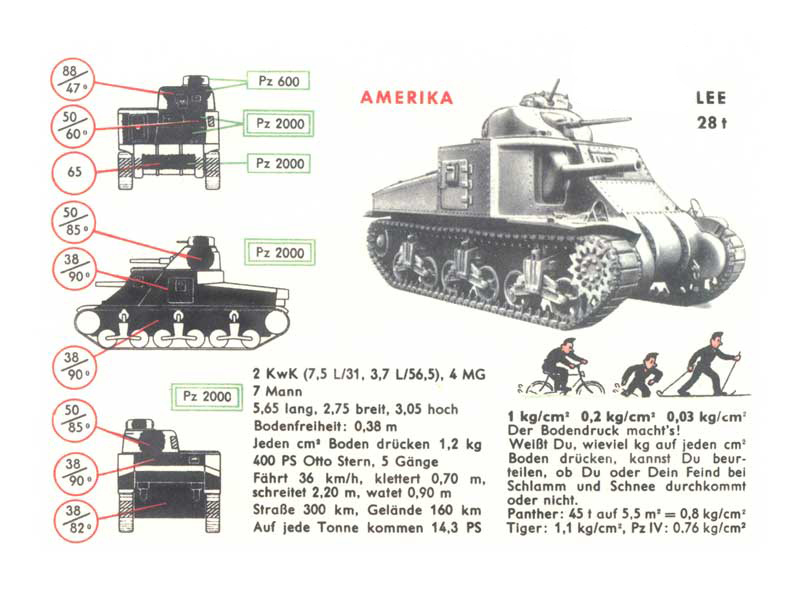
And now from Russia to America and the M3 Lee. Beyond its technical data, this page also explains the importance of ground pressure. This figure plays a major role in judging whether you or your opponent can cross soft terrain. For example, the Panther's 45-tonne weight is spread over a contact area of 5.5 square metres, giving a ground pressure of 0.8 kg per cm².
Appendix: M3 Lee
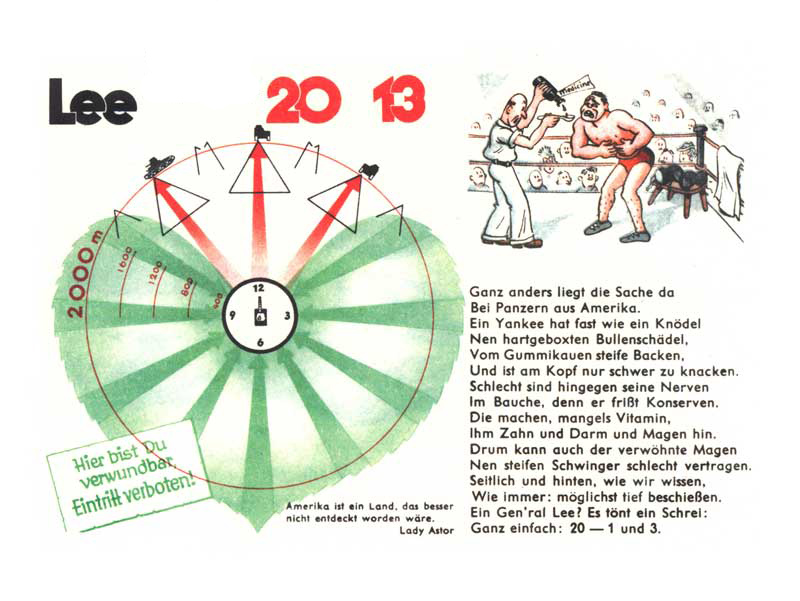
American tanks are different from the Russian ones. The American has a hard head but a soft belly, gone soft from living on nothing but tinned food. Remember to aim low. And above all – remember the danger of the linden leaf!

Reproducing text from the Panzernet website without the written consent of the operator is prohibited.